sslogo53_170_nsslogo53_170_nsslogo53_170_nsslogo53_170_n
  • Home
  • Products
    • ALL PRODUCTS
    • Software
      • Parquetex
    • Plugins
      • XS Material Presets | 3ds Max
      • ST Parquet | 3ds Max
    • Material Libraries
      • Material Presets Corona | Cinema 4D
      • Material Presets Redshift | Cinema 4D
    • Material Pack
      • 3ds Max
      • Cinema 4D
    • Plugins Free
      • 3ds Max
  • Gallery
  • Downloads
  • Forum
  • Support
    • User Guides
      • XS Material Presets for 3ds Max Help
      • ST Parquet for 3ds Max Help
      • Material Presets for Corona | Cinema 4D Help
      • Material Presets for Redshift | Cinema 4D Help
      • Parquetex Help
    • Contact Support
0

€0.00

Customer Area
✕

Use Pre-built Materials

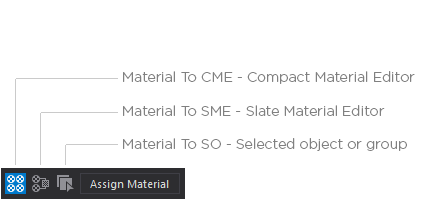
In the current version XSMP materials can be sent from presets library by three methods:
1. Using the toolbar button.
2. A choice of the required item in the material context menu.
3. Using the keyboard shortcuts.

Material To CME – Compact Material Editor active slot.
Material To SME – creates a new Slate Material Editor view with material.
Material To SO – to selected scene geometry node (group).

Using the toolbar button
Context menu

Right-click on the material item to show the context menu.
Select the appropriate item in the context menu.
The menu item will be active only when it meets the required conditions:
For example, you want to assign material to the selected object, but in a scene there is no selected object. Then the menu item will be inactive.
Or you want to send material to Compact Material Editor Active slot, but the Material Editor mode is Slate Material Editor (advanced).

Using the keyboard shortcuts

Select material item in the View.
Use keyboard shortcuts:
Material to selected object – Shift + O
Material to Compact Material Editor – Shift + C
Material to Slate Material Editor – Shift + S

XSMP Help

  • SETUP AND INSTALLATION
    • Requirements
    • Upgrade
    • Install Main plugin
    • Install Lab Scenes
    • Install Material Presets
    • Access XSMP
    • License Activation
    • License Deactivation
    • Settings
  • MATERIAL PRESETS LIBRARY
    • Use Material Presets
  • MATERIAL MANAGER
    • Create Library
    • Adding Materials
    • Filters and Search
    • Preview Image
    • Assign Material
    • Export Material
    • Manage Virtual Directories
  • MATERIAL LAB
    • Material Lab Scenes
    • Custom Scenes
  • CHANGELOG
NEWSLETTER SIGNUP

SIGER STUDIO NEWSLETTER

Would you like to keep up with the latest major news and announcements about our products from the comfort of your inbox? Then subscribe to our Newletter – we promise that we don’t send out many of these, so you won’t regret it!
This field is required.

Check your inbox or spam folder now to confirm your subscription.

Our goal at SIGER STUDIO is to provide good resource for designers and artists.
As this resource is ALL about quality and NOT quantity.
There is currently only a limited amount of products but we will do best to keep the list of content growing.

IMPRINT | TERMS AND CONDITIONS | PRIVACY POLICY | CONTACT US

Products

  • XS Material Presets | 3ds Max
  • ST Parquet | 3ds Max
  • Material Presets Corona | Cinema 4D
  • Material Presets Redshift | Cinema 4D
  • Parquetex
  • Plugins Free | 3ds Max

Support

  • User Guides
  • Contact Support
© 2025 Siger Studio. All Rights Reserved.
Customer Area
0

€0.00